
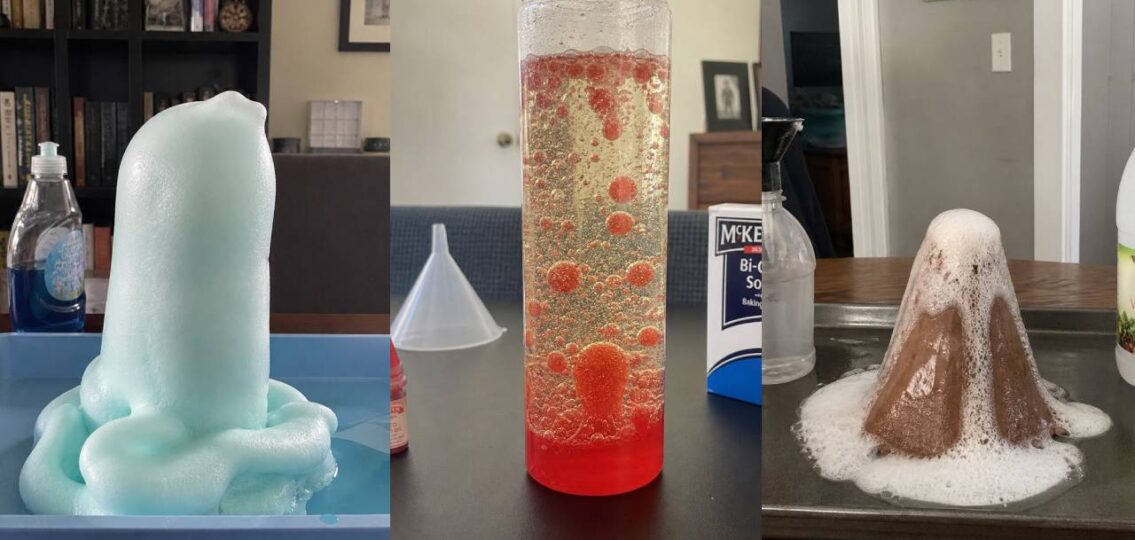
Science experiments are a fun, hands-on way to combine curiosity and excitement while learning. Whether you’re doing science experiments for kids, teens, or anyone in between, these screen-free options will keep everyone’s attention. Science experiments introduce kids to chemistry, physics, and engineering, or bring already-learned concepts to life.
When doing experiments, don’t forget to use safety goggles and gloves if using chemicals or heat, and set up on washable surfaces. Science experiments should be a learning experience, so you can also play a little game of science trivia as you go along.
Whether you’re doing science experiments for a school science fair or as a fun hobby at home, they are a great way to explore curiosity and learn. Here are some of the best science experiments for teens and kids you could start with.
At-Home Science Experiments For Kids
Science experiments for kids are a fun way to keep them entertained and away from screens on weekends, snow days, school breaks, summer, or a rainy after-school activity. Elementary and middle school-aged kids will love these science experiments.
DIY Lava Lamp
For this DIY Lava Lamp, you’ll only need a clear bottle, water, vegetable oil, food coloring, and an Alka-Seltzer tablet.
- Fill the bottle about ¾ of the way to the top, and then add water so there’s only a little space left.
- Add a few drops of food coloring.
- Break up an Alka-Seltzer tablet and drop it in.
This science project looks cool without the Alka-Seltzer, but kids will have to manually move the bottle around to watch the colorful oil blobs move. Adding the Alka-Seltzer creates a reaction so the blobs move up and down on their own, like in a real lava lamp.
@homeschoolingmandm It’s Friiiiiiday! You know what that means…SCIENCE!!!! Today we made one of our old favs, DIY Lava Lamps. It’s just so cool and so relaxing to watch! Try it with your little ones!! #homeschool #Arkansas #homeschoolingmandm #homeschoolersoftiktok
Walking Water
You’ll need clear cups, water, food coloring, and paper towels for the Walking Water science project.
- Line up your cups and fill every other one with water.
- Add food coloring to the water and mix it up well.
- Fold paper towels into strips and place them over the edges of the cups, connecting an empty cup and a full cup. Do that until each cup is connected.
Once everything is in place, wait and watch as the colored water “walks” up the paper towels into the empty cups, eventually creating a rainbow of all your colors.
@science.bae This is how water moves against gravity!! You gotta try this science experiment with your kids!! STEM for kids! Follow me on IG for full actovity detials! #scienceexperiments #stemforkids #stemactivities
Storm in a Glass
To create a Storm in a Glass, you’ll need a two clear glass containers, water, shaving cream, and food coloring.
- Mix food coloring and water in a glass.
- Fill a separate glass halfway with water and fill the rest with shaving cream.
- Drip the colored water onto the shaving cream foam, a little at a time.
The shaving cream holds some of the colored liquid, but like a cloud, it can’t hold it forever. Eventually, it comes down into the space below, and you can see how a storm brews.
@jakebsweet How to make a storm In a glass #learnontiktok
Dancing Raisins Science Experiment
All you need for this Dancing Raisins science project is a clear fizzy drink (like Sprite or club soda), raisins, and a clear glass.
- Pour the fizzy beverage into the glass.
- Add a few raisins.
This happens because raisins sink at first because they are denser than the liquid. But bubbles of carbon dioxide stick to their rough surface, making them less dense so they float. Once they reach the top, the bubbles pop and they sink again, creating the “dancing” effect.
@sarahstafford270 Hannah’s Dancing Raisins 11/6/25 #experimentalthursdays #makesciencefunagain #scienceclass #science #experiment
Chromatography Flowers
For a Chromatography Flowers science project, you’ll need coffee filters, markers, water, and a shallow dish.
- Draw thick rings with markers on the center of your coffee filter, using a few different colors.
- Fill a shallow dish with water.
- Fold the filter so that it’s a cone shape.
- Place the cone tip of the coffee filter into the water dish.
Chromatography flowers work because water moves up the paper through tiny spaces through a process called capillary action. The water carries the ink with it. As the ink travels, its different colors separate based on how easily they move with the water, creating the “flower” patterns.
@geeringup A simple at-home experiment showing chromatography using coffee filters, water, and some markers! 🙂 #STEMwithGU #scicomm #sciencetok #learnontiktok #scienceexperiments
Sound Vibrations With Rice
All you need for the Sound Vibrations With Rice science project is a bowl, plastic wrap, rice, and something to make noise with.
- Place the Saran Wrap tightly over the bowl.
- Sprinkle some rice on top.
- Play music or make loud noises nearby.
This is a great way to visualize sound frequencies and learn about waves. Experiment with how far away you can be and with different volume levels.
@twinkl_resources Try this jumping rice science experiment to explore sound waves. #scienceexperiments #scienceathome #sciencefacts #scienceforkids #teachersoftiktok
Fun Magic Milk Science Experiment
Magic Milk only requires a shallow dish, milk, food coloring, dish soap, and a cotton swab.
- Pour milk into the dish.
- Add drops of different food colors.
- Dip the cotton swab in dish soap.
- Touch the surface of the milk with the soap-dipped cotton swab.
Milk contains fat, and dish soap is designed to break apart fat. When you touch the milk with the soap-dipped cotton swab, the soap starts spreading out quickly and pushes the fat away. As the fat moves, it carries the food coloring with it, creating the swirling, moving patterns you see.
@thehibiscusteacher This magic milk stem activity was so much fun. The dish soap molecules are attracted to the fat molecules in the milk. As soon as you introduce the soap to the milk/coloring mixture the molecules race around trying to bond. The food coloring gets pushed around in the process and appears to burst. #toddlersoftiktok #sahm #sahmsoftiktok #preschool #preschoolteacher #preschoolactivities #preschoolathome #preschoolathomeactivities #preschoolscience #preschoolscienceactivity #magicmilkexperiment #magicmilk #fyp #foryou #foryoupage #toddlerscanread #scienceexperiments #scienceathome
Static Butterfly
This simple science project for kids only requires tissue paper, a balloon, and scissors.
- Cut a butterfly shape from the tissue paper and place it on a flat surface.
- Rub the balloon on your hair to charge it with static.
- Hold the static-y balloon near your butterfly.
This experiment works because of static electricity. When you rub the balloon on your hair, it builds up an electric charge. That charge creates a force that can pull on lightweight objects. The tissue paper butterfly is very light, so when you bring the charged balloon close, it gets attracted to the balloon and may lift up or move.
https://www.tiktok.com/@careermomnista/video/7524098558962765087?lang=en&q=static%20butterfly&t=1770179168525
Science Experiments For Teens
Teens sometimes want to have fun and get off screens, and science experiments give them a hands-on approach to science that doesn’t necessarily feel like learning. For teens, the science experiments should be a little more advanced and include more steps in the process.
Soap Rainbow
Make a rainbow out of soap using a plate with edges or a tray, a water bottle, scissors, food coloring, a rubber band, a wipe, and dish soap.
- Cut a bottle in half.
- Cover the cut end with a wipe, securing it with a rubber band.
- Put stripes of each color of the rainbow on the wipe using food coloring.
- Put a thick layer of dish soap on the plate, and dip the wipe into the soap.
- Blow into the mouthpiece of the water bottle.
This experiment works because of surface tension. When you blow into the bottle, air moves through the wipe, which is coated in soapy water. The soap lowers the water’s surface tension, allowing it to stretch into thin films that trap the air and form bubbles.
https://www.tiktok.com/@abacusbrands/video/7482871878739316014?lang=en&q=science%20experiments%20for%20teens&t=1770176881127
DIY Solar Oven Science Experiment
A DIY Solar Oven requires a cardboard shoe box, aluminum foil, black construction paper, clear plastic wrap, tape, and snacks for cooking, like s’mores.
- Line the inside of the box with foil, including the lid.
- Cut a piece of black construction paper to the bottom of the inside of the box, so it’ll go beneath your snacks.
- Put your snacks inside.
- Leave the box open, and cover the opening of the box with plastic wrap.
- Place it in the sun and wait.
Sunlight enters the box through the clear plastic wrap. The black construction paper absorbs the sunlight and turns it into heat. The aluminum foil reflects extra sunlight into the box, helping it get even hotter.
The plastic wrap helps keep the heat inside, like a lid, so it doesn’t escape. This creates a mini “greenhouse effect,” allowing the temperature inside the box to rise enough to warm up or even melt your snacks.
@thebridgetc See more teen programs like this in the link in our bio. #DIY #cooking #oven #fyp #viral #nonprofit #orlandpark #illinois #baking #NissanShowUp
Water Cycle in a Bag
For a Water Cycle in a Bag project, you’ll need a resealable plastic bag, a sharpie, water, and optional blue food coloring.
- Before putting anything in the bag, write on it with sharpie. You can make a sun and clouds up top with ocean waves at the bottom, or even label it with vocabulary words and draw arrows.
- Pour a little water into the bag, add blue food coloring, and seal it up.
- Tape the bag to a sunny window.
- Wait to see what happens.
Over time, the water will evaporate, condense on the sides of the bag, and drip back down. This is a great way to explain how the water cycle works.
https://www.tiktok.com/@kaye.1325/video/7186696993958448430?lang=en&q=Water%20Cycle%20in%20a%20Bag&t=1770179702270
Balloon Rocket
You’ll need a balloon, a string, a straw, and tape to make a balloon rocket.
- Place a straw on a long string and tie it between two chairs or other objects.
- Blow up a balloon (but don’t tie it), and tape it to the straw.
- Let go.
As the air rushes out of the balloon, it’ll quickly move along the string. It’s an example of Newton’s Third Law of motion.
https://www.tiktok.com/@mckel_arrowood/video/7541173940769541390?lang=en&q=Balloon%20Rocket&t=1770179978739
Fruit DNA Extraction
A fun way to learn about DNA is through this extraction experiment using strawberries, bananas, water, salt, dish soap, a coffee filter, and cold rubbing alcohol.
- Mash the fruit in a plastic bag.
- Add salt, dish soap, and water mixture to the mashed fruit.
- Mash it some more and let it sit for five minutes.
- Filter it by placing the coffee filter over a cup and slowly pouring your fruit mixture into it.
- Add ice-cold rubbing alcohol.
When you do this, tiny white strands of DNA float to the top. This teaches teens that everything has DNA, not just humans.
@science.bae What’s your favourite fruit??? #scienceexperiments #scienceathome #teachersontiktok
Fire Snake
The Fire Snake experiment requires baking soda, granulated sugar, sand, lighter fluid or rubbing alcohol, a metal tray or other fire-safe surface, a lighter or matches, safety goggles, and heat-resistant gloves. It involves fire, so teens should only do it with adult supervision and while following safety precautions.
- Mix baking soda and sugar in a bowl.
- Pour sand in a small mound onto your fire-safe surface.
- Make a small indent in the center of the sand mound.
- Carefully pour a small amount of lighter fluid or rubbing alcohol onto the sand.
- Place a small amount of the baking soda and sugar mixture into the indent in the sand.
- Using a match or lighter, carefully light the mixture and step back.
When you light the fuel, it creates heat that starts to burn the sugar. As the sugar burns, it breaks down and turns into carbon. At the same time, the baking soda releases carbon dioxide gas when it gets hot. The gas pushes the soft, hot carbon outward, causing it to expand and grow into a long, snake-like shape.
https://www.tiktok.com/@insanecuriosity/video/7220291875545074949?is_from_webapp=1&sender_device=pc&web_id=7531955084461835831
Can Crushing
For the Can Crushing science experiment, you’ll need aluminum cans, tons, a bowl full of ice water, and a heating element like a stove or burner. It involves heat or flames, so adult supervision and safety equipment like goggles and gloves are essential.
- Place the bowl of ice water next to the heating element.
- Place your can on the heat.
- Use the tongs to quickly place the can with the open side down into the ice water.
When you heat the can, the water inside turns into steam and pushes most of the air out of the can. Then, when you quickly flip the hot can into ice water, the steam cools down and turns back into liquid water.
This sudden change creates a low-pressure space inside the can. The air pressure outside the can is now much stronger, so it pushes in and crushes the can almost instantly.
https://www.tiktok.com/@thekrystaroberts/video/7580495937001311543?lang=en&q=science%20experiments%20for%20teens&t=1770176881127
Paper Bridge Challenge
A Paper Bridge Challenge requires paper, tape, and coins or something of similar weight.
- Build a bridge using only paper and tape.
- Using the coins, test how much weight it can hold before it collapses.
This is a great way to introduce engineering and physics.
@shivaburb